 Guide to setup a network at home to deliver all the services needed.
This is mostly used to record how things are setup at home, and be able to come back when I need to update, make changes or add things. Else, I would not never remember it.
Background
I live in a typical 3 bedroom Irish house. To satisfy everyone’s need, the home network needs to:
- Enable mobile devices at home with fast Internet access
- provide home automation to control heating, lights, alarm and others nice to have features in a connected home.
- Stream media (TV, music, photos and videos)
- Provides shared folders for documents, photos, home videos and archives.
- Host some web pages
- Keep backups
- Facilitate testing on different platform, OS and
- Be fast, easy to use, secure and light on energy and the wallet…
Although some of it can be provided by some cloud services, I like to keep things local as much as possible, and it’s also fun to implement.
Solution
The first step is to determine what infrastructure and hardware I’ll need for it. I also don’t have very deep pockets for it, so I’ll reuse as much as possible what I have available.
Infrastructure
I want to use cables as much as possible, and not rely on WiFi for everything. WiFi will be available to laptops, phones and tablets, but the rest should run on wired network as much as possible, ideally on 1 Gigabit network.
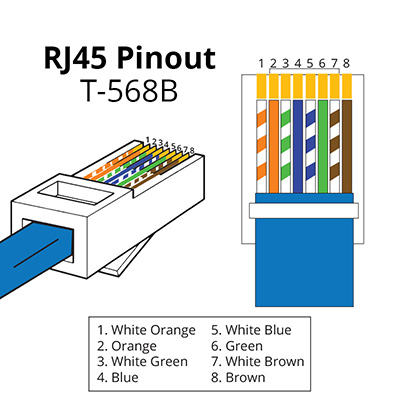
A 100m CAT6 or 5e cable reel and crimping tools are pretty cheap nowadays. I used 568B wiring for the cables.
Hardware
The server needs to be powerful enough to run everything, while small on energy. I used initially an old Asus EEEPC netbook, but is wasn’t suitable to run TV tuners, large hard drives and virtual machines properly, so I need to built a small server.
I have a few sensors scattered around the house to measure temperature, humidity… and activate various items, so a Raspberry Pi is used when the features can’t be provided by the server. Small wireless node, Jeenode or MySensors, will also be used. They are Arduino based, and easy to implement.
Software
The raspberry Pi will use Raspbian, which is Debian based. The server will run Ubuntu LTS. I have more experience with Debian based operating system than others like CentOS or openSUSE, hence my choice, but any Linux server based operating system should do really.
They will all run without screen, everything will be done through command lines, or web interface.
Most services will be implemented as docker containers. It makes for quick deployment, convenient management and easy backup and recovery.
List of services
| Service | Description | Docker | Notes |
| Pihole | DNS, DHCP and network wide ad blocker | No | Virtual machine on Debian |
| NFS | NFS File shares | No | |
| Samba | SMB File shares | No | |
| Nut | UPS Monitor | No | |
| HomeAssistant | Smart home hub | Yes | Available online |
| Jellyfin | Media streaming | Yes | Available online with TV streaming |
| Redis | Key-value datastore | Yes | |
| Nextcloud | Private cloud | Yes | Available online |
| MariaDB | DB server | Yes | |
| Syncthing | File synchronisation | Yes | |
| TFTP | TFTP server for PXE | Yes | |
| Emoncms | Data logging | Yes | Available online |
| Portainer | Docker management | Yes | |
| Traefik | Reverse proxy | Yes | |
| Watchtower | Container updater | Yes | |
| Dockerproxy | Docker socket proxy | Yes | |
| Nodered | Flow based tool | Yes | |
| InfluxDB | Time series DB | Yes | |
| Grafana | Data visualisation | Yes | |
| Mosquitto | MQTT broker | Yes | |
| Adminer | Database management | Yes | |
| Tasmoadmin | Tasmota management | Yes | |
| ESPhome | ESPhome management | Yes | |
| TVheadend | TV Streaming | No | |
| Virtualbox | Virtualisation | No | |
| Duckdns | Dynamic DNS | No | |
| Apache | Web server | Yes | |
| WordPress | Blog platform | Yes | Available online (This website) |
The home automation is a mix of MQTT, Node-red, Homeassistant, emoncms and Z-Wave devices.
Streaming TV is done with Tvheadend, photos and videos are setup with Jellyfin.
Network shares are managed with Samba, NFS. Private cloud services are provided by Nextcloud.
For virtualization, I use VirtualBox.
How to
I will add articles as I document each topic.